We collect basic website visitor information on this website and store it in cookies. We also utilize Google Analytics to track page view information to assist us in improving our website.
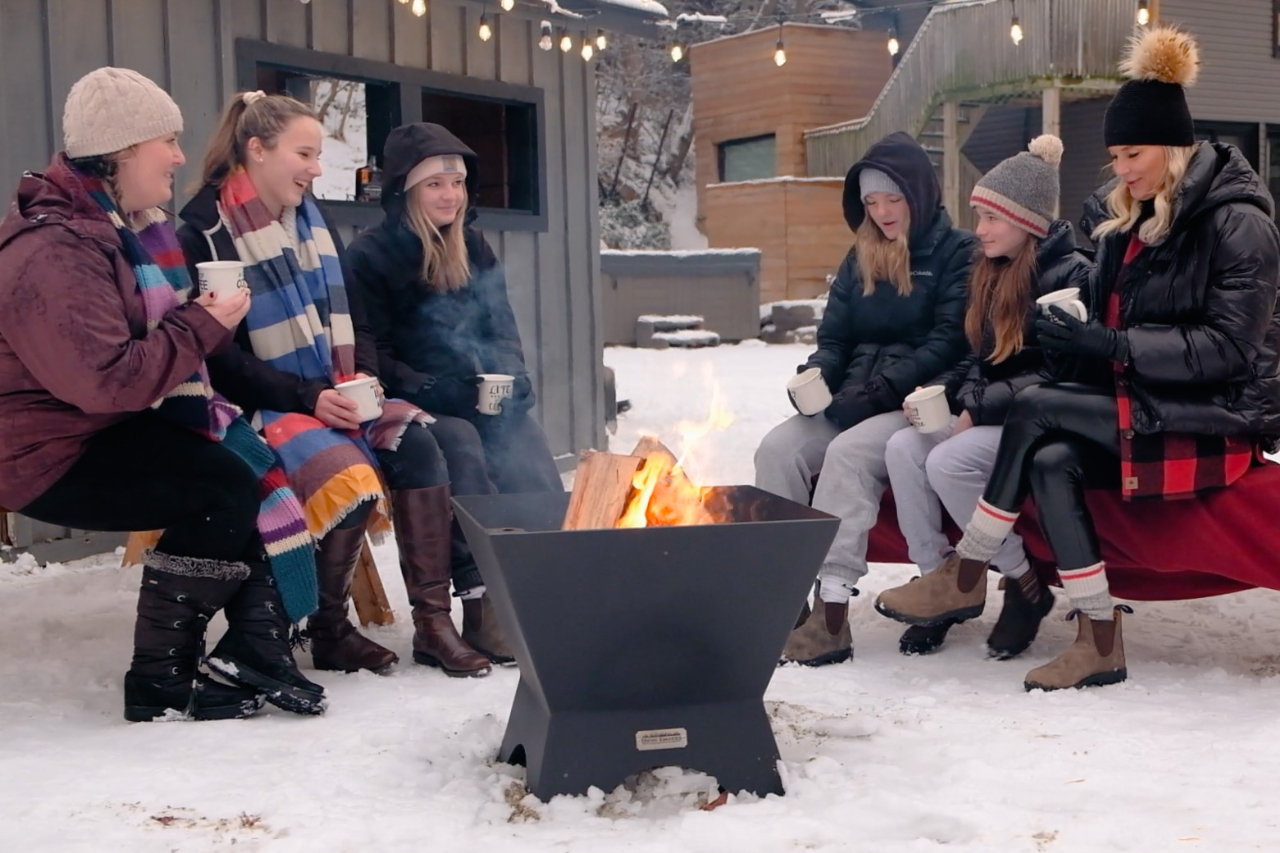
Entertaining outdoors during the winter holds a unique charm. The winter landscapes often showcase a serene and magical beauty with snow-covered surroundings and glistening frost with the natural winter scenery becoming a picturesque backdrop, adding a special touch of enchantment to outdoor events. However, as enchanting as winter landscapes may be, they are also cold. An outdoor fire pit is essential to an enhanced winter outdoor gathering for many reasons.
Cozy Ambiance. The contrast of the chilly weather against the cozy warmth of the flames that emanate from the outdoor fire pit creates a relaxed and inviting atmosphere.
Focal Point. A fire pit becomes the centerpiece of the outdoor setting, providing warmth and mesmerizing visual element. The dancing flames create a captivating and comforting atmosphere, encouraging guests to gather around and share stories.
Functional Warmth. Winter evenings or afternoons can be chilly, but a fire pit provides functional warmth, making the outdoor space comfortable for socializing. It allows people to stay outside for longer periods without feeling the biting cold.
Cooking and S’mores. Fire pits can be used for cooking, whether it’s roasting marshmallows for s’mores or preparing simple snacks. This adds an interactive and enjoyable element to the gathering, as people engage in the process of creating and sharing food.
Encourage Outdoor Activities. Winter sports and activities like ice skating, sledding, or even a simple walk in the snow can be complemented by a cozy fire pit setting for relaxation afterward.
Decorative Lighting. The soft glow of the fire pit, combined with other decorative lighting elements, can create a magical and enchanting outdoor space, making winter entertaining visually appealing.
In summary, outdoor entertaining in winter has a charm tooted in the season’s unique qualities. A fire pit enhances this experience by providing warmth, a focal point for socializing, and an opportunity for interactive activities, all while creating a cozy and inviting atmosphere in the crisp winter air.
Choosing an outdoor fire pit for your outdoor space can be overwhelming as there are many options. The outdoor fire pits from Iron Embers are not only high in quality but also high in design. With each fire pit having their own unique features, we have highlighted some the different options available.
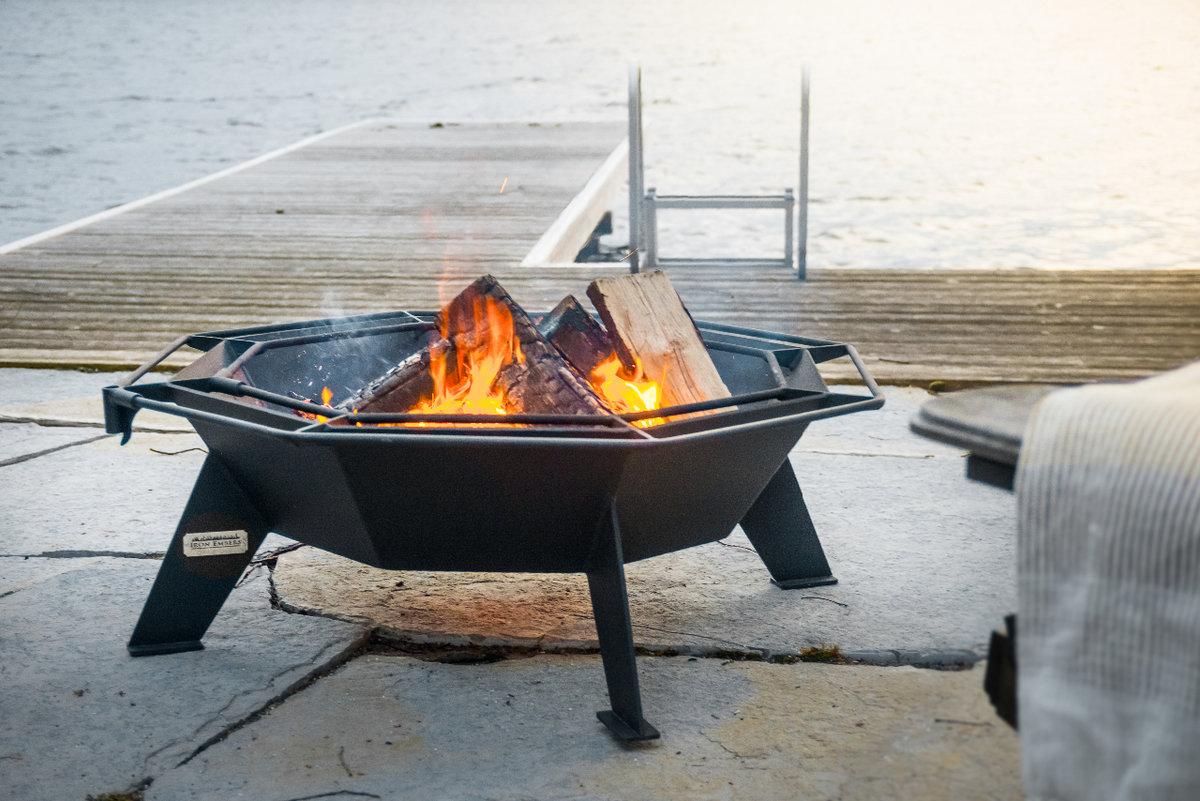
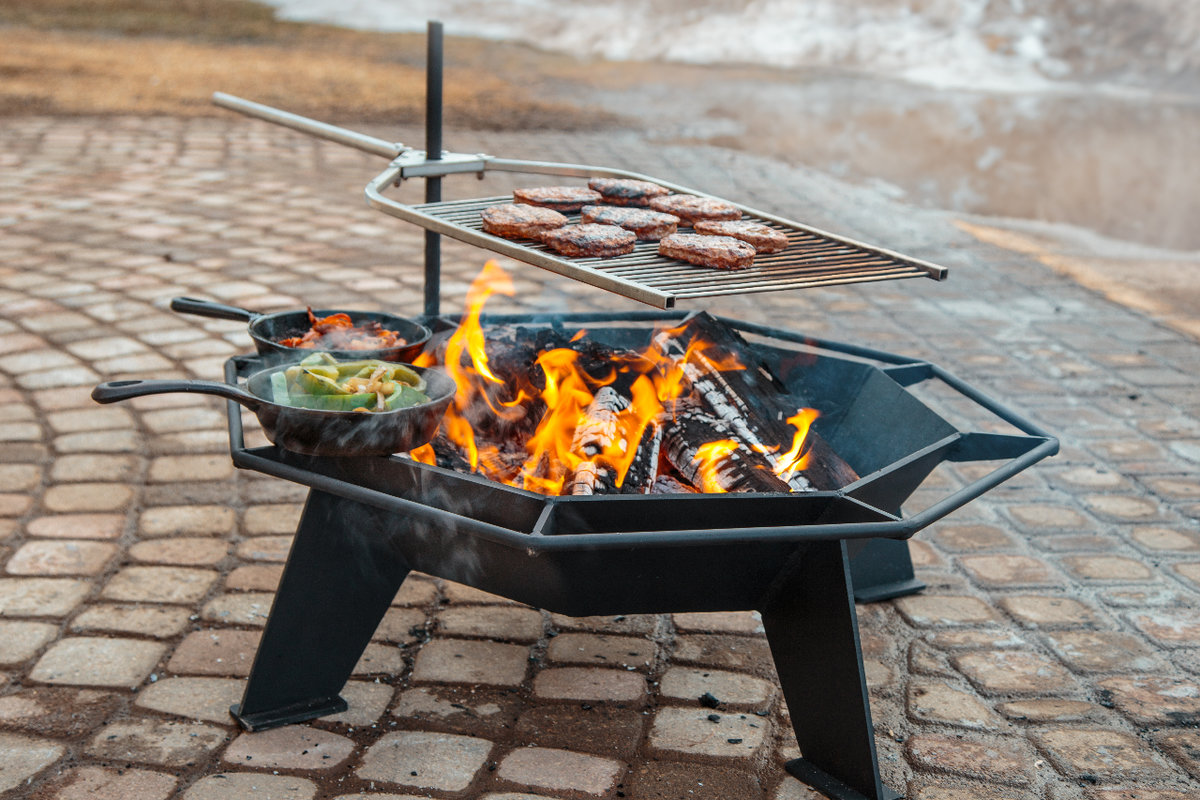
The Octagonal Cottager. Built from ¼” steel, this fire pit is made to last. The Octagonal Cottager is the perfect balance of style and function. Unique rod rings surrounding the fire pit add an eye-catching design as well as create the perfect resting spot for your cast iron frying pan. To further the outdoor cooking experience, this fire pit comes with a grill adapter giving you the option for a stainless-steel cooking grill that is adjustable to help you get the perfect temperature or the option of a BBQ plate grill with a fixed height design sturdy enough for heavy items.
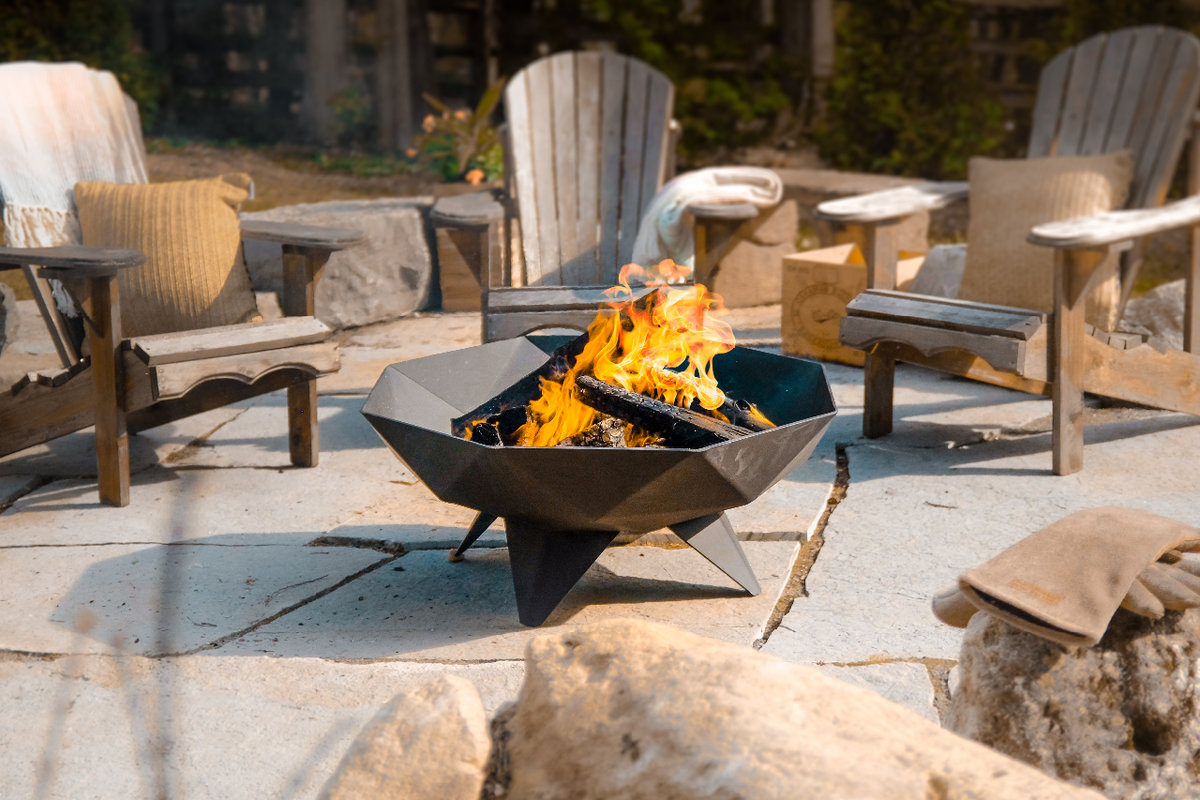
The Polygon Fire Bowl. If you are looking for elegance, then look no further than the Polygon Fire Bowl from Iron Embers. Crafted with precision laser cut parts to create an eye-catching design, this fire bowl is designed to be a star at your next gathering. Available in three different sizes, there is sure to be a perfect-sized Polygon Fire Bowl to fit your outdoor space.
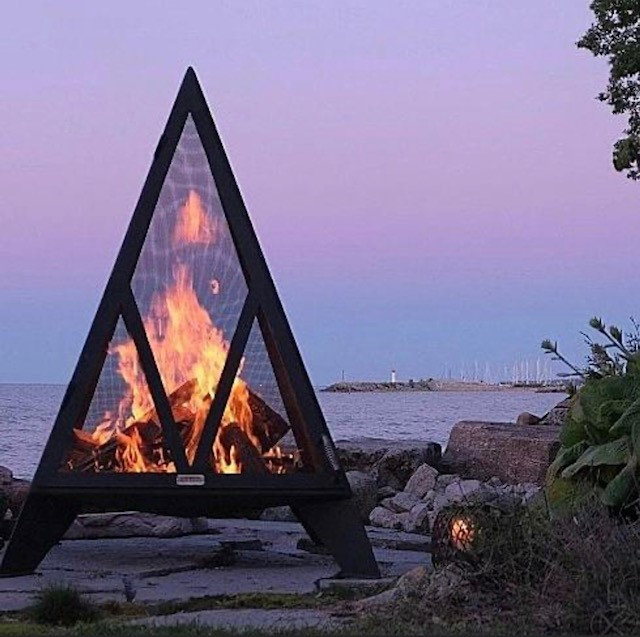
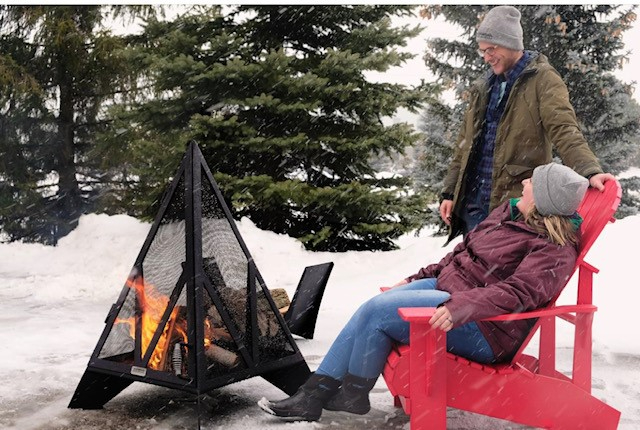
The Pyramid Fireplace. This outdoor fireplace is a stunning architectural feature for your outdoor space, even when it is not in use! Designed to kick the heat out on all sides of the pyramid, keeping warm by the fire is not a problem. A large hinged door with an easy grip handle allows easy access to add fuel to your outdoor fire all while keeping it contained. All of these benefits of the Pyramid Fireplace make it our most popular outdoor fireplace.
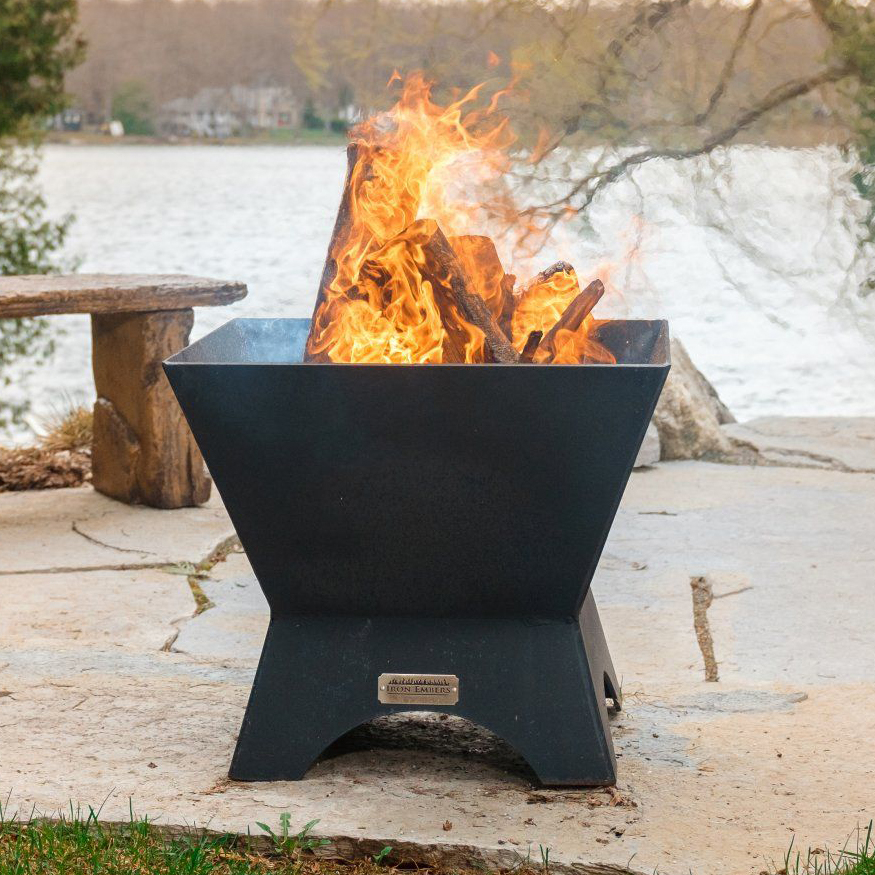
The Modern Cube. With clean lines and modern design, the Modern Cube is a functional piece of craftmanship in your own backyard. The deep, thick sides of this fire pit radiate the heat outwards while protecting your legs from the flames. With a variety of different sizes and a small footprint the Modern Cube Fire Pit is a popular choice for many backyard landscapes. For versatility there is the option of an additional steel flat top lid that fits perfectly on top of the fire pit when it is not use creating a stunning coffee table.
Using a fire pit in the winter can be a cozy and enjoyable experience, but it’s important to prioritize safety. Here are some tips for safety using an outdoor fire pit during the winter months:
By following these safety tips, you can enjoy the warmth and ambiance of an outdoor fire in the winter while minimizing the risks associated with outdoor fires.
As far as maintenance of your Canadian-made outdoor fire pit, Iron Embers offers perfectly fitted covers for all of their outdoor fire pits. These covers not only help to protect your outdoor fire pit from the natural elements but also keep your fire pit dry so it is ready for you to use when you want to build your outdoor winter fire.
It is recommended that once a year you give your fire pit a good cleaning and scrap off any surface rust that may appear. Once the surface rust is scraped off and you have removed any remaining particles apply a coat of Matte Black Touch Up Paint available from your Iron Embers provider to make your fire pit look brand new! It is important to use the specified Matte Black Touch Up Paint from your provider as this paint is a high-heat enamel paint designed for the outdoor fire pits.
As you can see, there is not a great deal of maintenance involved in caring for your Canadian-made outdoor fire pit. With just a little amount of care, your Iron Embers fire pit will be enjoyed for generations by your family.
Whether we like it or not, winter is part of living in Canada and although for some of us it seems like it lasts forever, this too shall pass so why not try and enjoy it! Winter outdoor entertaining can be a unique and delightful experience, offering a chance to enjoy the crisp winter air. For more information and helpful tips on entertaining outdoors in the winter months be sure to visit the following blogs:
Hygge – The Scandinavian Lifestyle of Cozy
Making Fall Cottaging Cozy with Canadian Fire Pits
How To Choose An Outdoor Fire Pit For Your Space
With thoughtful planning, winter outdoor entertaining in the Canadian winters can be a joyful and memorable experience for everyone involved.
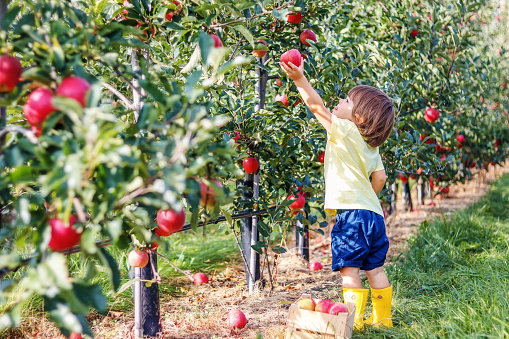
Are your children, or grandchildren, already dreaming and talking about our upcoming summer weather when they can build campfires and make S’mores?
Open fire cooking is actually a delightful method of preparing meals, which gets you out of the kitchen and into the fresh air, enjoying the sights and smells of our wonderful outdoors in South Western Ontario. This method of cooking is also far more interactive and social, and produces tastes which your stove-top never could! So read on for best tips, the do’s and don’ts of cooking over an open fire, and a recipe or two.
If you enjoy the outdoors and wish to pursue this new cooking opportunity, the first step is to invest in a suitable campfire grill for your campfire cooking. It’s an investment you won’t regret! Iron Embers, a local company from Guelph fabricates durable, heavy duty, ¼ inch thick steel firepits; each is welded solid and polished smooth by their team of expert fabricators. Because the firepit is so solid and durable, it can be used all year.
Then you can complete the firepit experience with a choice of Iron Embers functional accessories. A choice of two accessories will have you grilling your next meals in style – either the steel plate grill or the adjustable stainless grill.
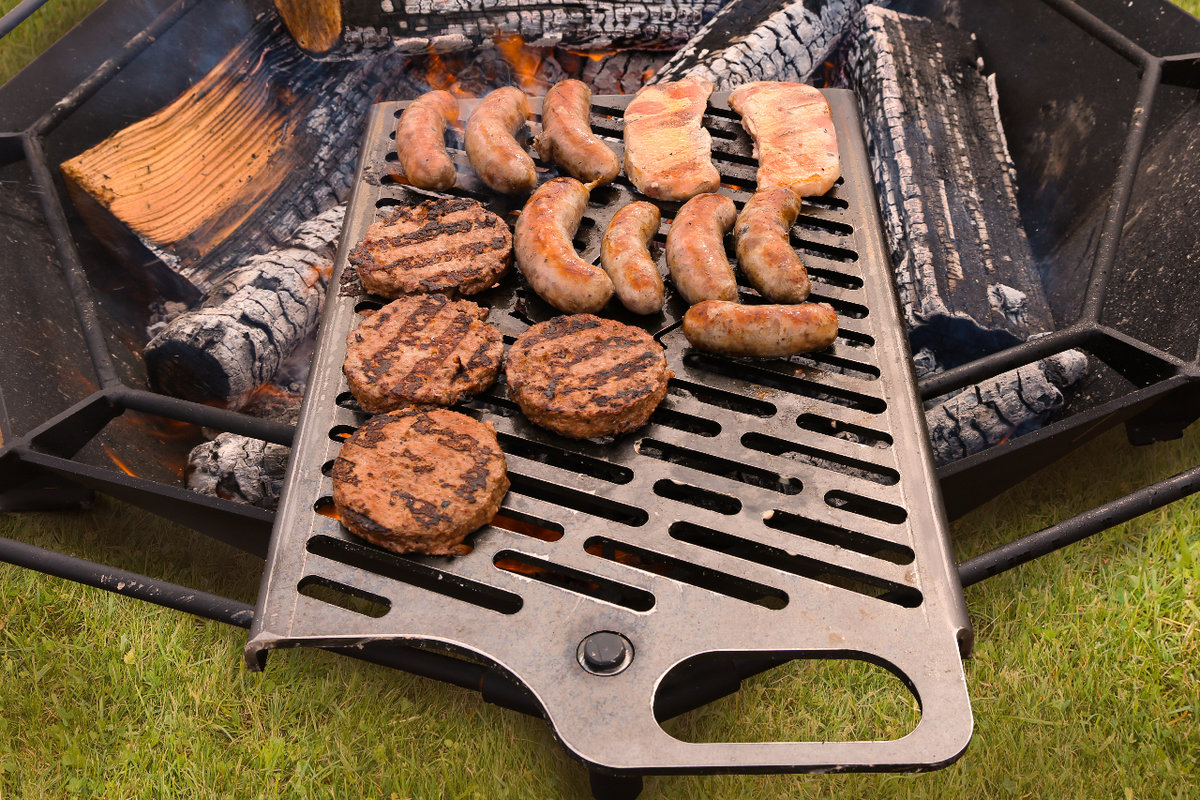
The steel plate grill, with its fixed height design, is sturdy enough to support large pots and pans over the fire, in addition to grilling.
The stainless grill is the most popular grilling accessory with its adjustable height on the support rod, allowing easy control of the distance between your meal and the heat source. You may not be able to have total control over the heat of the fire, but with the adjustable grill you can find the sweet spot to cook your food to wood-fired perfection! Either way, the grill can swing out of the way of the heat to give you even more control of the cooking.
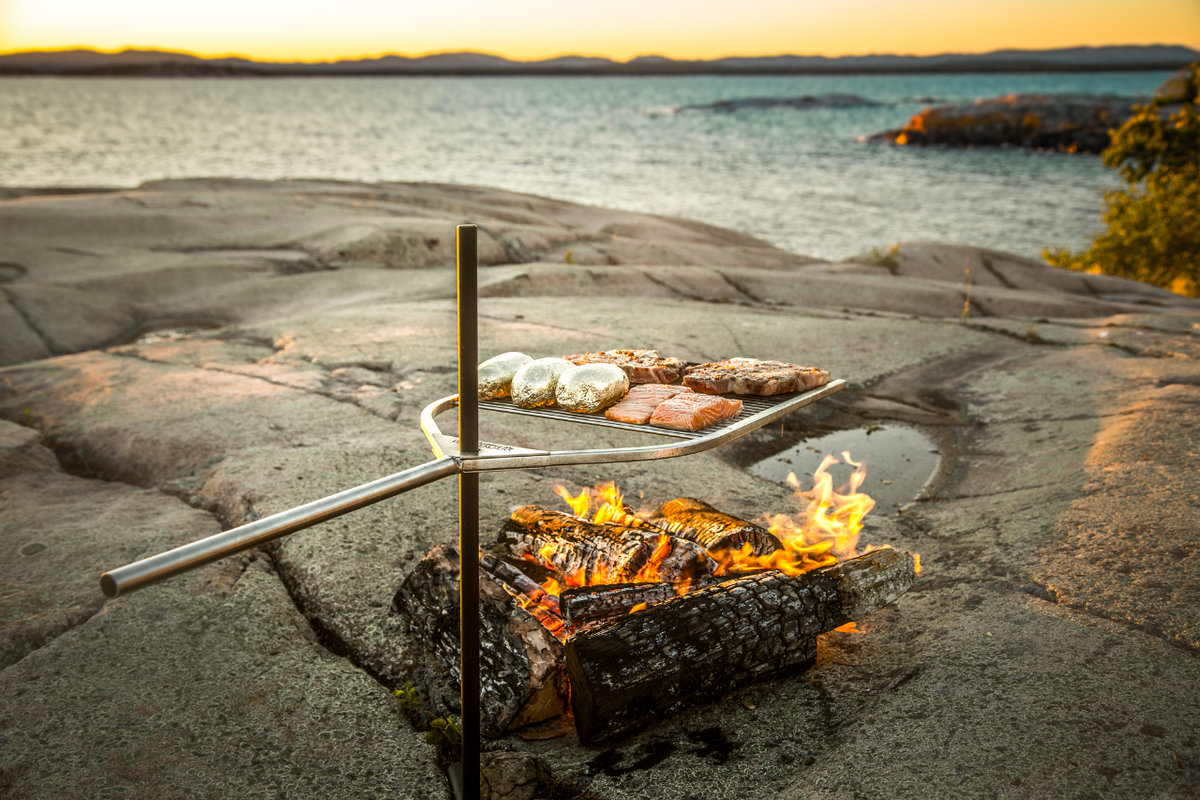
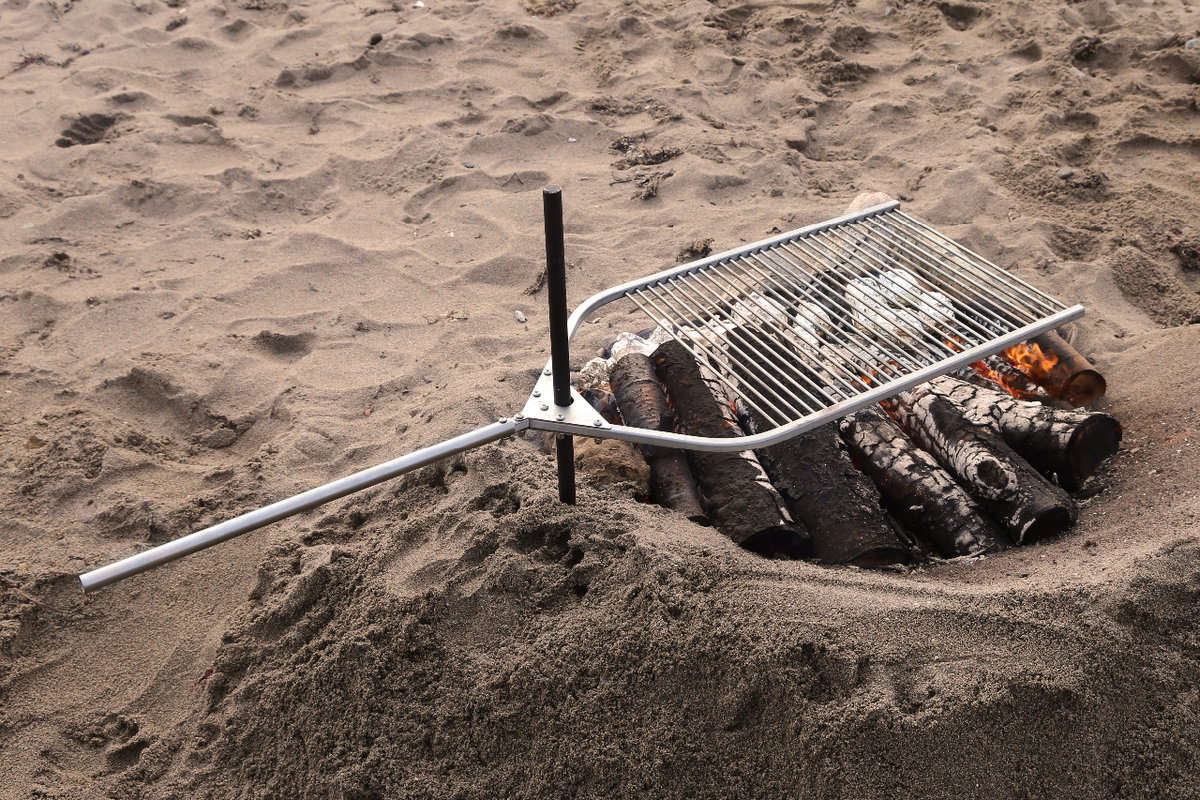
However, you don’t actually need to buy the firepit to get started – you can just purchase one of the grills with the special ground stake pole and insert it into the ground beside your campfire. Some grill masters set their grate between two and six inches above the coals, using the following tip for figuring out how high to place it: put your hand above the coals and see where it becomes uncomfortable to hold your hand for more than a second or two, and that’s where to set the grill.
Just know that the biggest difference between cooking over an open fire and cooking on a gas or charcoal grill is that an open fire is much more unpredictable! There is a lot more variation in hot and cold spots as the coals burn down, and it’s a lot harder to predict flare-ups. This means you need to pay more attention to the fire than you would to a grill.
So, what are the tricks to know as you plan your new grilling adventure? We’ve listed a few key points to help you get started.
Do find a suitable location
Try to ensure your fire is sheltered from the wind, as any medium to strong wind could potentially be hazardous, if sparks get away. Also, coals reduce more quickly which means a shortened cooking time.
Do use the right firewood
A rookie mistake is using green or freshly-chopped wood, and you will be a dead giveaway with the excessive smoke billowing from your fire. To create a classic fire in your firepit, use dry, seasoned wood, so be sure to have a handy stockpile.
When you’re going to be cooking over a fire, you want to use hardwood, such as oak, hickory or mesquite, and not a softwood like pine. Softwoods, especially pine, burn differently and can give off a lot of sticky resin that can add a tarry flavour to whatever you are cooking. One handy tip is to segregate your wood pile into cooking versus non-cooking wood.
Don’t be impatient
When you see flames, this is not an indication that your fire is ready for cooking. A good fire is constructed primarily of hot coals and just a few logs of burning wood. Depending on the fire itself and wind conditions, it can take 30 to 45 minutes to burn down to the right conditions. So, ensure you plan ahead and give your fire the time to burn down to the right conditions before you commence cooking, as a bed of glowing coals is the ideal fire for roasting.
Size matters!
This patience also extends to the size of your fire, as size matters when cooking! Bigger is not better when it comes to roasting conditions. Beginners make the mistake of trying to build a really big fire; the issue with this approach is that big fires take too long to die down before you can actually begin your grilling. Like-wise, you don’t want to build too small a fire and risk insufficient heat to cook the food in a reasonable amount of time.
Do set up a tool mise en place
Mise en place is a French culinary term which means “putting in place” or “gather” – in other words, setting up an organized work area with everything in its place. When you’re grilling, you should follow the same philosophy, especially with tools required for the grill. You’ll need a fork or spatula, and depending on what you’re making; tongs and a brush for sauces are also helpful. Set up your grill for success rather than running around trying to find utensils and letting the food overcook.
This concept should also be applied to prepping your meal prior to grilling. Check your recipes in advance and do any peeling, chopping or mixing prior, so that your focus can be on getting the right open fire conditions to create a spectacular meal.
The Tamarack log holder with steel table top option creates a convenient space to help keep you organized while you are cooking over the open flame as well as stores your firewood for easy access to fuel your fire.

Don’t cook directly over the flame
Just as your children or grandchildren roast marshmallows over an open flame, we may think that all meals are done in that way. However, placing all food directly over an open flame is a guaranteed way to get a burnt meal.
Some experts suggest that the trick is to build a fire on one side of your firepit or campfire and use the other side primarily to move hot coals; this approach allows the grill master to move coals in and out of the cooking area, depending on the heat required.
Advice from experts is to begin with a small starter fire with kindling and smaller logs, letting it burn for 30 minutes or so and only adding a few larger pieces of wood as required. This approach will ensure a substantial base of coals and sufficient direct heat for cooking. A bonus is that it also means you have enough wood to keep the fire burning all evening!
When you’re cooking over an open fire, you want to cook over the coals, ideally when they are white hot. Coals provide much more even heat than flames do, and they’re a lot less likely to turn your dinner into inedible crispy burnt nuggets.
Know the difference between direct and indirect heat
Knowing the difference between direct and indirect heat, and when to use each, or both, is the difference between a grill rookie and a grill master.
Direct and indirect heat are both terms that refer to open fire cooking, or grilling. Direct heat means to cook the food directly over the heat source, like the coals mentioned above, and is a high-heat method (and get you great grill marks!), while indirect cooking refers to cooking adjacent to the heat source.
According to some grilling experts, a combination of direct heat for searing followed by indirect heat for longer, slower cooking can be one of the most skillful ways to use the grill.
Direct heat is used to cook relatively small or thin pieces of food quickly. Typical foods that are direct grilled include steaks, chops, chicken breasts, fish fillets, seafood, vegetables, and bread. In the case of grilling, it’s cooking over the hot coals. Direct heat is responsible for beautiful grill marks, juicy burgers, and crispy grilled vegetables. It’s also great for quick-cooking foods like vegetables, hot dogs, and most seafood, especially shrimp. Direct heat is also great for searing meat to give it color and a crisp skin.
Indirect grilling is designed to cook larger or tougher foods that would burn if direct grilled. This is the method used to cook ribs, pork shoulders, briskets, whole chickens and turkeys, and other large pieces of food, that require long, slow cooking at a low or moderate temperature (275 to 350 degrees). As the name suggests, the food is placed next to, not directly over or in contact with the bed of coals. Traditional barbecue (slow-smoked meat) is produced via indirect heat as well.
A combination of direct and indirect heat is often called combo heat or combination cooking.
Combo cooking is most often seen with large pieces of meat, which are seared over direct heat and then slowly cooked over indirect heat. Grilled chicken is also frequently cooked with a combination - a quick grill over direct heat for grill marks and caramelization, then moved over to indirect heat and cooked over a more moderate temperature until the chicken comes to temperature. Combo heat cooking is also great for grilled fruit and denser vegetables like cabbage.

The only thing you need now is some recipe inspiration. Our grill master friends at Iron Embers have suggested the following links, to get you started:
There look to be some amazing recipes, including Creamy Campfire Clam Pasta with Tomatoes, Ginger Salmon with Green Beans, Foil-Packet Jambalaya, Cajun Boil on the Grill, Campfire Banana Boats, and Foil-Packet Spiced Nuts if you want a showstopper, in addition to the more anticipated grill recipes. Go ahead, give cooking over an open flame a try at your next outdoor gathering and remember practice makes perfect!
Visit Cottage Culture for all your Iron Embers and fireside needs. Our knowledgeable staff are available to answer your questions and help you choose the best firepit for your outdoor space. Ask about our free delivery and set up!
Looking for fireside inspiration? Follow us on Facebook, Instagram, and Pinterest.

At the end of each year, it is tradition for interior designers, paint experts, and fashion gurus to release their predictions for the hottest colours of the upcoming year. “Colours of the Year” are based on societal and design trends the experts see, and every industry pays attention to them. Amazingly, these annual predictions can influence everything from paint colours to couch cushions to kitchen appliances.
Are you ready to see the 2023 “Colour of the Year” predictions? Read on below to see the trendiest colours and learn more about incorporating them into your outdoor living space.
While 2022 focused on bringing more green into interior and exterior spaces, the 2023 “Colours of the Year” are all about self-expression and prioritizing health and well-being in the home.
Nods to nature and earthy tones are popular and utilized to create spaces that feel protected, calm, and cozy. Elegant whites and grey-beiges are also trending, creating opportunities for fresh starts.
Here are all the predictions we have seen so far:
While not highlighted in this article, Valspar has also unveiled its picks for "Colours of the Year" with 12 stunning hues that echo the trends noted by other experts. Cozy White, Gentle Violet, Rising Tide, and Villa Grey are just some of the colours on their esteemed list.
Below, we dive into some of the different colours of the year and offer tips on how to incorporate them into your outdoor living space.
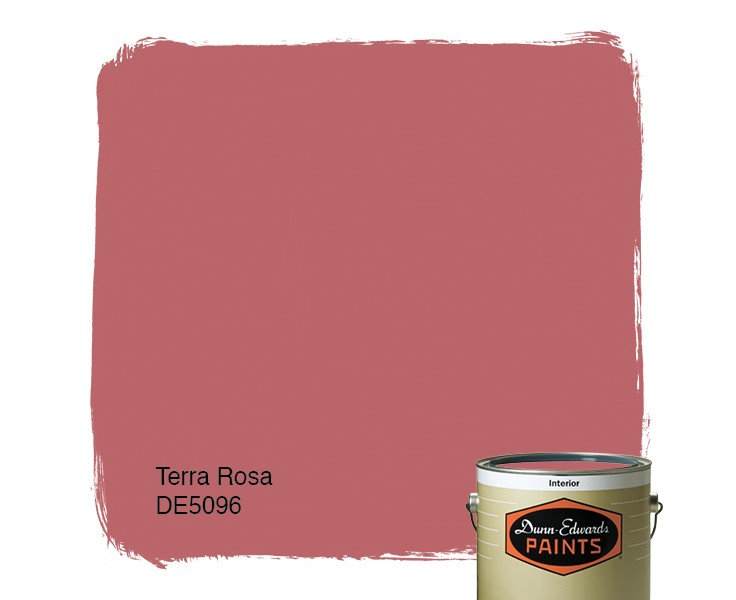
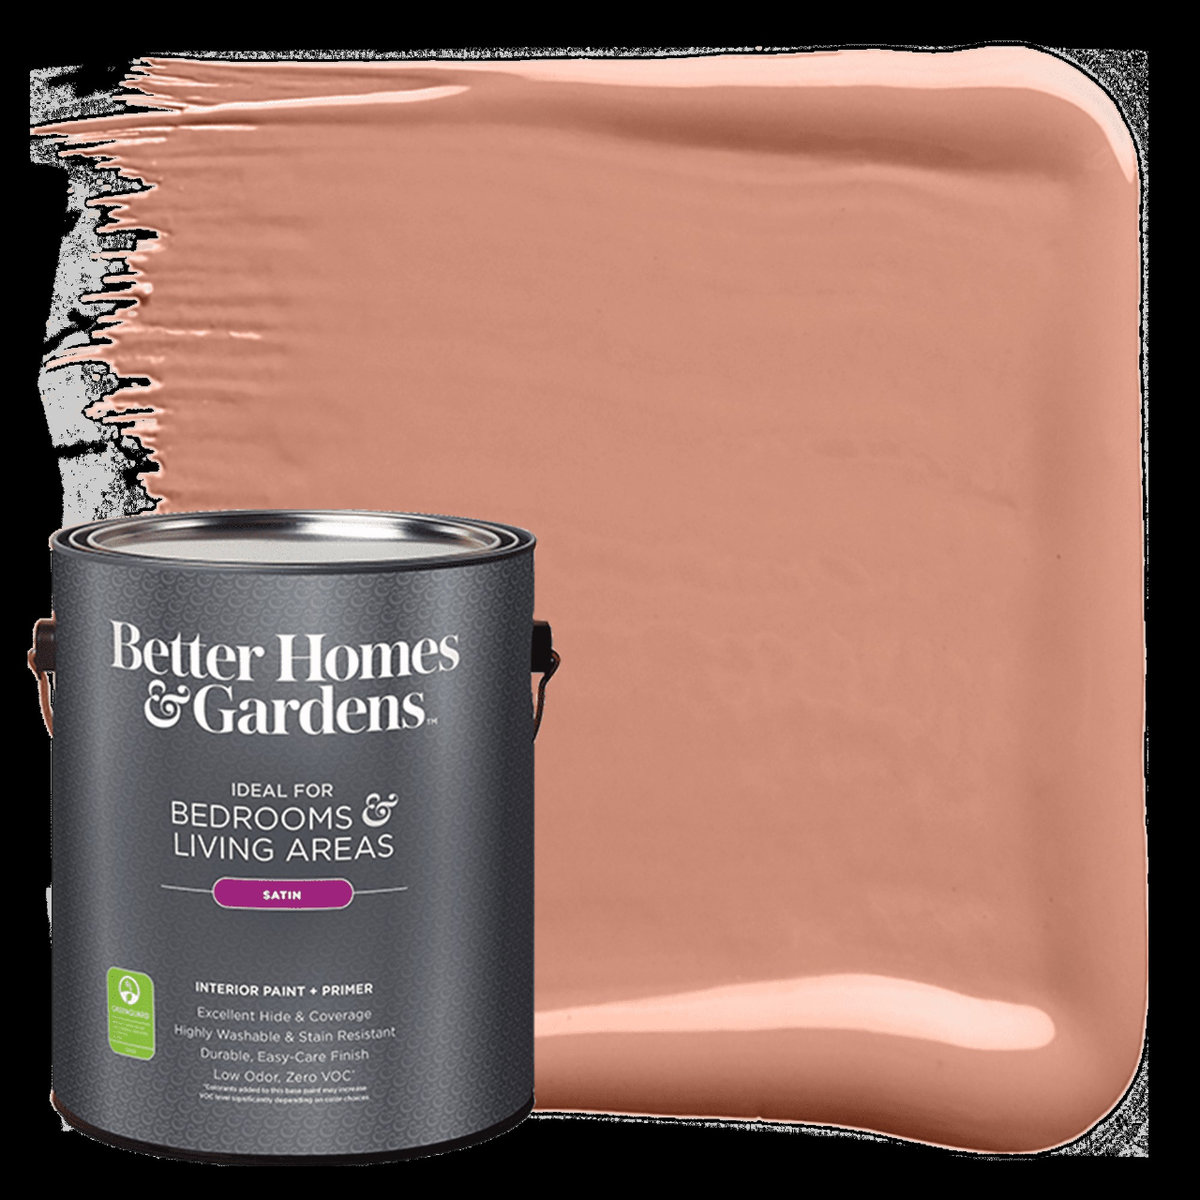
Terra Rosa by Dunn-Edwards is a bold, romantic, nostalgic, and approachable hue perfect for a neutral background or as an accent colour. It’s rosy-pink tones with a slight nod to terracotta provide a sophisticated, yet pretty look for any space.
This "Colour of the Year" pairs well with white accents, tan linens, slate greys, and blush pinks. Add pops of black, green, sky blue, or yellow to complement Terra Rosa and make the space your own.
Complement Terra Rosa colours on your deck or patio with a Pamir Pendant Lampshade in beige or natural. Toss a Solid Crinkle Throw in Fawn Pale Beige/Medium Beige over your outdoor sofa or add a pop of yellow in your outdoor kitchen with a Dandelion Linen Hand Towel.
For a moodier look, incorporate black and slate furniture or accents. Try the 3ft Polygon Fire Bowl or the Amesdale Lounge Set.
Redend Point by Sherwin-Williams is a beautiful blush-beige with pink undertones that is a perfect example of a mid-tone neutral. It offers warm energy with earthy colours, creating a sense of serenity while bringing a touch of desert-esque nature to a space.
This modern and energizing neutral can stand on its own or pair well with other neutrals like beige. Similar to Terra Rosa, Redend Point looks great with white. It is enhanced by natural accents like rattan, terra cotta, and grassy greens.
Pair Redend Point with unique décor items like the Dutchess Indoor/Outdoor Pillow in your outdoor space. Opt for rattan patio furniture like the Kamomill Armchair or accessorize with the Haya Set of 3 Outdoor Planter Baskets with a rattan finish. A Hassel 2.5 Seater Sofa would also look stunning with a Redend Point-coloured pillow or throw.
The terra cotta-inspired and pinky trend continues with Better Homes and Gardens pick - Canyon Ridge. However, while Terra Rose and Redend Point lend themselves to a more romantic, traditional, or moody look (depending on how you choose to style it), Canyon Ridge creates opportunities to have some fun.
A vibrant cobalt pairs well with Canyon Ridge, as do greens, reds, and whites. Because this "Colour of the Year" works well with almost any hue, you can express your creativity and bring your own style to the mix. For modern spaces, take the risk with cobalt accents. Opt for denims for rustic spaces, or stick with a timeless navy if a traditional look is what you are going for.
Try the Noosa Pillow or the Atlas Fleece-Lined Throw for denim décor. The Bertrix Pillow in Patterned Sand would also pair perfectly with desert-inspired Canyon Ridge.
![]()
Blank Canvas by Behr is appropriately named due to its ability to complement any design you can envision. This "Colour of the Year" offers a clean, fresh, rejuvenating, and inviting
hue that provides more visual interest (and less starkness) than pure white. Use it on its own or as a grounding starting point for visually appealing layers.
Blank Canvas offers limitless possibilities for both indoor and outdoor living spaces. It invites us to embrace a fresh start and aligns with the trend of creating a sense of calm and rejuvenation. Yet, at the same time, it challenges us to demonstrate our individuality.
Bring Blank Canvas aesthetics into your patio furniture with outdoor sectionals like the Lyra 2.5 Seater or Armchair. The Vevi Coffee Table in white is another way to incorporate the vibes of Behr’s Colour of the Year.
Complement Blank Canvas-esque outdoor furniture by boldly experimenting with different colours, textures, patterns, and materials. Try a rug like the Bold Strike Shag Mat, add some interest to your table with the Kimono Rectangle Placemat, or incorporate pops of colour with the Patek Turkish Towel

Glidden’s Vining Ivy brings nods of nature into your space with its blend of blues and greens. While it looks like a bold choice at first, this energizing “Colour of Year” is extremely versatile and can work in both classic and contemporary styles.
Use Vining Ivy to create a welcoming, cozy, and tranquil environment that feels homey for you and your guests. In your outdoor living space, utilize Vining Ivy as an accent in your patio cushions, pillows, throws, rugs, and towels.
Pair Vining Ivy with wood finishes, rich textures, and stone accents. For a concrete tabletop look, try the Virgo Coffee Table. Opt for the Eios Teak Dining Table or the Circus Dining Table with Lazy Susan to incorporate natural wood.
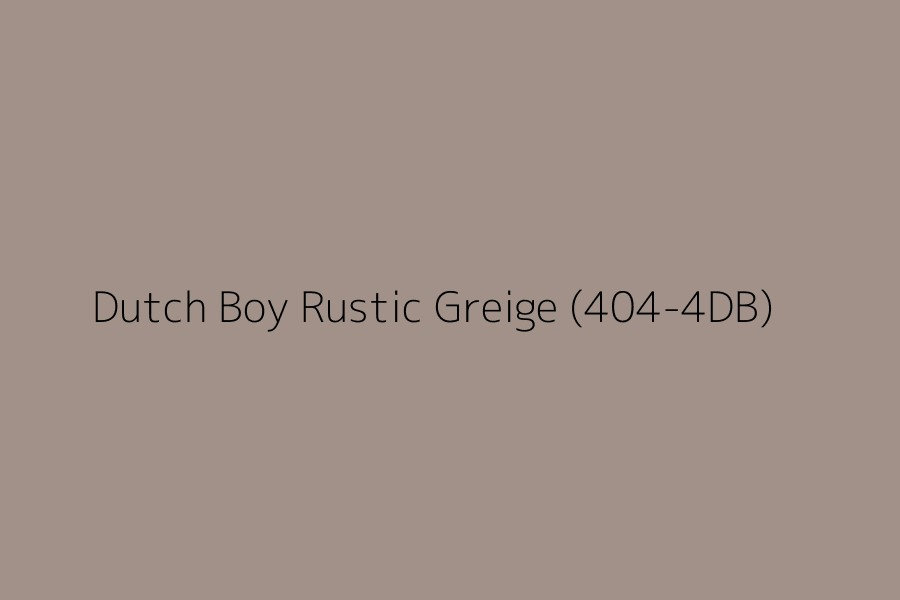
Last but certainly not least is Rustic Greige by Dutch Boy. As its name suggests, this "Colour of the Year" is a mix of grey and beige. It has subtle red undertones, which make it a great match for the other earth-tone paint and décor items that are on-trend.
Like other colours on the list above, Rustic Greige is grounding, cozy, comforting, and calming. Its warm, neutral tones can be used as a backdrop to soften bolder colours, but it can also stand on its own as the focal point.
To complement Rustic Greige in your outdoor living space, incorporate the Blixt Lounge Chair in Pink. Alternatively, make greys a focal point with an outdoor sectional from the Ambon collection. The Ayla Turkish Towel in Red is also a creative way to stay on trend, add visual interest, and pull out the red undertones of Rustic Greige.
Whether you are attracted to the bold and romantic hues of Terra Rose, the warm energy of Redend Point, or the opportunity to be adventurous with Canyon Ridge, you
are sure to find outdoor furniture and decor items that bring in one (or more) of these "Colours of the Year." Pair the desert and terracotta-inspired hues with earthy colours like tan, white, blue, green, and yellow. Also, plan to have some fun experimenting with different textures, patterns, materials, and finishes.
For nods of nature and a bold yet versatile colour (that may initially seem beyond your comfort zone), opt for Vining Ivy's blue-green blend. Make it the star of your space, or incorporate it more subtly with outdoor décor and accessories. Pair it with wood and stone accents to keep your outdoor space on-trend.
If Terra Rose, Redend Point, Canyon Ridge, and Vining Ivy seem too adventurous for now, colours like Blank Canvas and Rustic Greige may be just what you are looking for to rejuvenate your space. Both hues are cozy, inviting, and versatile. Utilize them as a base for layering or let them shine as the focal point. Dare to pull in the other "Colours of the Year" with outdoor pillows, throws, towels, and rugs.
No matter which colours you choose to spruce up your backyard, deck, or patio next year, we know you will have a great time experimenting with colour and expressing your personal style.
What did you think of the 2023 "Colours of the Year?" Did any of the hottest colours for summer 2023 catch your eye? Are you already getting excited about how to incorporate some of them into your backyard, patio, or deck? If so, you will love what Cottage Culture has in stock!
Browse our online patio furniture collection or visit our showroom in Hensall, Ontario to start making your vision come to life. Though you are likely packing up your outdoor living space and preparing to hunker down indoors for the winter, it is never too late to start planning for your perfect patio next season!
Are you looking for outdoor living inspiration? Follow us on Facebook, Instagram and Pinterest!
Fall is less than a week away on the calendar, despite the lovely warm weather we’ve been enjoying! And it’s an enchanting time of year!
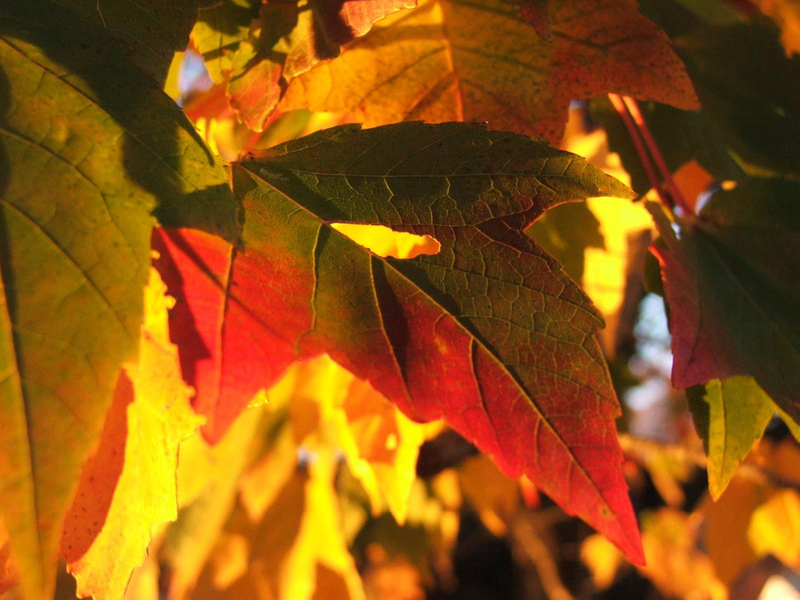
Cooler temperatures, crisp leaves and bright colours – bursts of yellow, orange and red dotting the landscapes around the country signal that one of the most spectacular seasons in our part of Ontario is arriving. Fall, no matter your age, still somehow signals the chance to start anew. The season almost urges you to slow down, savour quiet moments, dig into harvest foods and discover new experiences.
So, take a moment to plan the perfect respite between summer and winter at your cottage, and enjoy the beauty of the changing seasons in your locale, whether it be hiking, apple picking, enjoying bonfires. However, you don’t need a cottage to enjoy this season, just a willingness to get out in nature and enjoy the fresh weather and surroundings.
The Cottage Culture team dug into what enjoyable fall activities come to mind for each of us, and share a few of our favourite ways to safely embrace autumn this year.
Autumn is a second spring when every leaf is a flower."
- Albert Camus
Orchards are now open for apple picking at Ontario farms, and to our way of thinking, nothing signals the coming of fall like biting into a crisp fresh apple that you picked with your own two hands. Peak picking stretches right through September and October, so find an orchard open for picking near your cottage and take the family apple picking for the day. Couple that with a full day of farm fun, like corn mazes and wagon rides, and you have an ideal day outing with the family.
Then what could be better than baking your apple pies after picking the ingredients with your own hands? Here are just a few area orchards open for picking: Apple Land Station, Thorndale; ; The Red Barn Fruit Farm, Arkona; Smith’s Apples and Market, Port Elgin; Maxwell Apple Orchards near Collingwood; Meleg’s Lakeview Orchard, Kingsville; Thiessen Orchards, Leamington.
Always check to see that visiting and picking is allowed. Otherwise choose to visit the numerous area orchard markets who’ve done the work for you! Also check open hours before you head out.
We are fortunate here in South Western Ontario to have access to two Great Lakes for our fishing enjoyment. Local experts suggest that fishing in the fall is when you may be most likely to catch the biggest fish. If you don’t have you own boat, there are a number of fishing charters leaving rom ports all along the Lake Huron shoreline, leaving from Sarnia, Kettle Point, Port Franks, Grand Bend, Goderich, Kincardine, to name a few. Charters also serve Lake Erie, departing from Erieau and Colchester. You can enjoy the last fishing moments of the season (until ice fishing begins!) and impress your family with your fresh catch.

There are so many beautiful spots to hike in the fall, it’s difficult to capture them all. For me, one of my favourites is hiking along the shores of Lake Huron, Georgian Bay (or Lake Erie), when you get to a viewpoint and see stretches of crystal blue waters along side pops of bright colour – think the Bruce Trail, Canada’s oldest and longest marked footpath, with over 900 km of main Trail and over 450 km of side trails. Accessible to explorers of all ages, the Bruce Trail connects you to the wonders of the Niagara Escarpment – cobble beaches, open meadows, waterfalls, rocky crevices, old growth forests and awe-inspiring views. While another recommends an enjoyable hike closer to home, in Rock Glen Conservation Area, where you can wander through a forest filled with rare trees, soak up waterfall views, and enjoy a scenic gorge in this area. You can even go fossil hunting! And still another, hiking along the Elora Gorge, suggesting that if you are only going to visit a small number of charming towns in southwestern Ontario this fall, then you might choose Elora. Not only is it a lovely little town full of colourful places for strolling, but a hike through the Elora Gorge Conservation Area in the fall will wow you with brilliant fall foliage. If you take the trail through the park, you can catch sight of the over 70 foot cliffs that line the gorge – truly a visit for your bucket list!
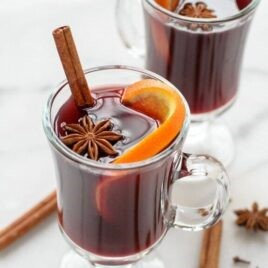
Cocktail hour at the cottage in the summer, whether on your dock, or deck, is hard to beat. But, have you ever thought about sitting outside in cozy sweaters with thick blankets draped over your outdoor lounge chair, sipping mulled wine or warm cider? You can watch the sun go down, and see the rays light up the surrounding colourful foliage, then see the stars come out. You’ll be wishing you’d thought of this sooner.
We have our favourite mulled wine recipe to share with you, here.
The Best Mulled Wine Recipe
The best traditional mulled wine recipe with brandy, apple cider, and mulling spices. This hot spiced wine is festive, easy, and perfect for parties!
While we can’t state authoritatively that this is the most traditional mulled wine recipe (there seem to be as many variations of mulled wine as there are European cafés in which to sip them), we’ve made enough batches to say with confidence that this is the best mulled wine recipe.
Prep: 5 minutes; Cook: 30 minutes
Servings: 6 servings
Ingredients
Instructions
Notes
This recipe scales easily. Feel free to increase the batch size by as much as your slow cooker or pot will hold.
TO MAKE ON THE STOVE: simmer the wine, apple cider, orange zest and juice, and spices in a large pot or Dutch oven the stove over low heat for 30 minutes, instead of heating in the slow cooker. Do not let the wine boil Add the brandy and serve.
TO STORE: Let your slow cooker mulled wine cool completely, then pour it into an airtight storage container and place in the refrigerator for up to 3 days.
TO REHEAT: Gently rewarm mulled wine in a large pot on the stovetop over low heat, or pour leftovers into your slow cooker and reheat on LOW until warm.
Notes on the Ingredients:
Spices. Cardamom, cinnamon sticks, and star anise are the mulled wine spices. Even if you don’t love anise, the flavor here is subtle, well balanced, and gives this spiced wine an extra note of flavor that you don’t want to miss.
Ground spices not recommended, as they will float on top of the wine and not incorporate properly.
Brandy. The final edge this spiced wine needs to reach its peak
A lot of people underestimate how enjoyable evenings are at the beach. While we enjoy bonfires on the beach right through the summer, we find that now, as the temperatures cool down, there is nothing more special than enjoying a bonfire. Firepits are an excellent way to avoid any issues with legality of having a bonfire in your location; they also raise up the level of the fire to help keep everyone warm. Cottage Culture staff would be happy to show you their sturdy Iron Embers firepits.
The following checklist of items will ensure you create the perfect bonfire experience;
However you plan to spend your time this fall at your cottage be sure to savour the moments, it's the little things that create the largest memories!
